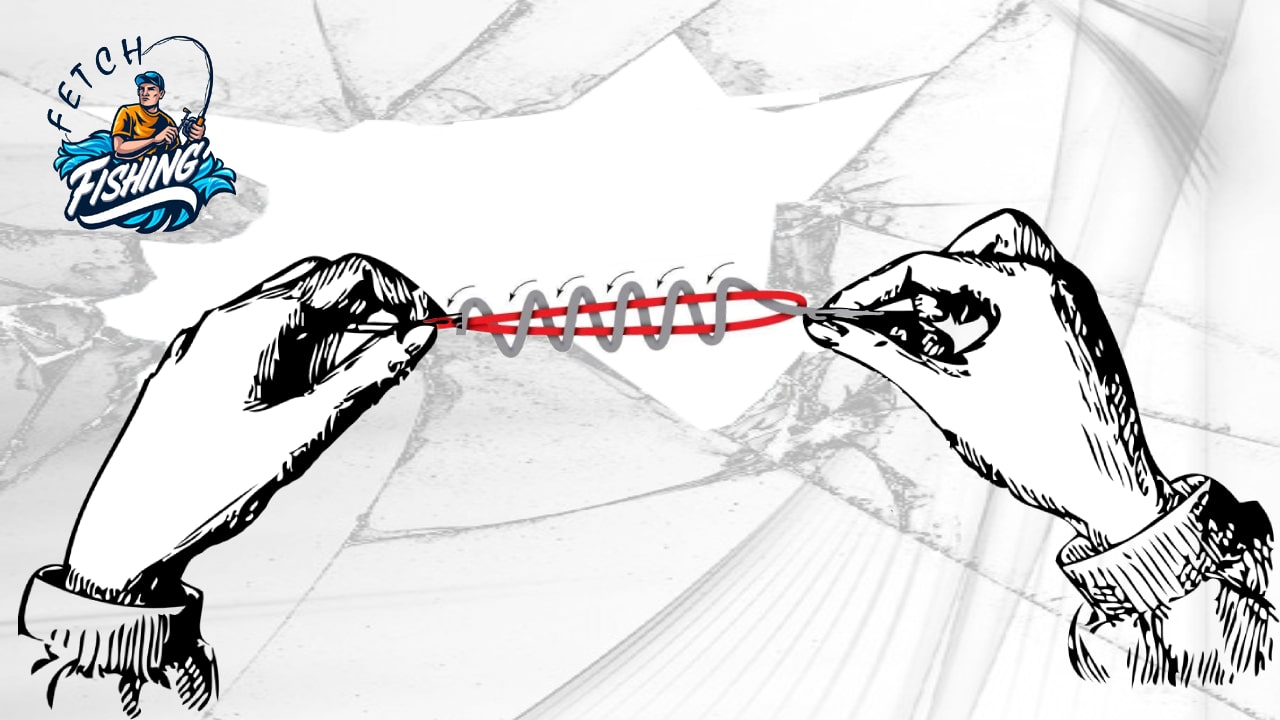
We all love fishing in this world as it is the way to communicate with people and also have fun while fishing. Well, fishing is a silent way to catch fish, but it also has the make and is not an easy way to fish. As we know, there are different types of fishing knots you can use to make the way to change your fishing. The Alberto knot makes it very clear to have to catch a fish but have a different way to tie the knot to make it stronger and more efficient way; you can do the fishing as they are being prepared to make it stronger. This is rigged to make it strong and slips, then you can cord to be braided rope and also the Para cord. Many people try different knots with many fishing and surgical knots that can prevent them from not ravelling and also the spellings. It makes it important to make it turn nearly around the loop for the larger line and also dress the knot so that it turns.
What is an Alberto knot? How to Tie an Alberto Knot?
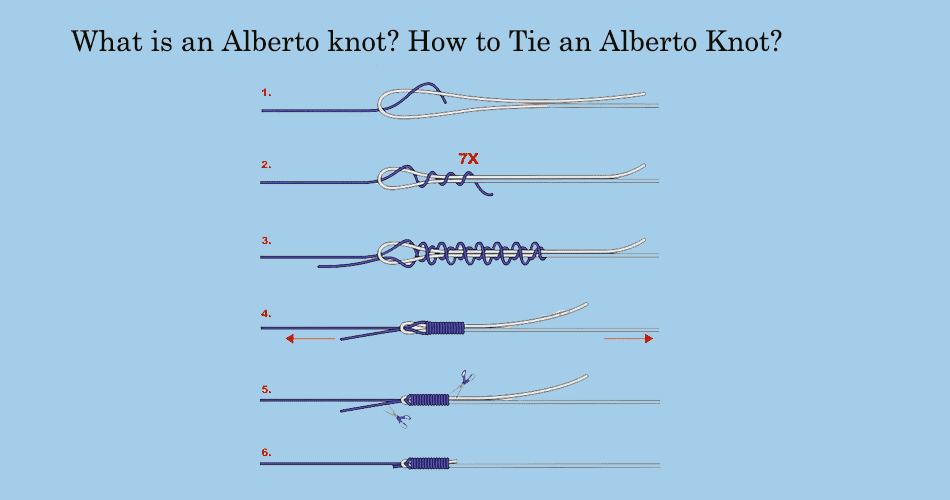
The Alberto knot also called the Alberto knot or the modified Albright knot, is too famous for anglers to know about it works as connecting two lines with different materials and also the diameters to use for the knot. It is very useful for fishing and has created a strong knot that can be tried again if you want to, which makes it very easy to have a healthy way to handle things. In this guide, we will provide information about the Alberto knot with the process of how you can tie the Alberto knot on the way. This can begin with the importance is to practising tying the knot on the piece that can be used for the rope and the cord before trying to make the knot while making it with the make rope line before fishing.
Given below is the process that helps you tie the Alberto knot to learn the steps, which is easy o make the Alberto knot very easy.
Step 1. Make a Line with the Rope.
You have to take the two lines, which you can connect side-by-side way with the ends from the overlapping. The length of the rope be 10 to 12 inches of roop. Make sure you keep the extra knot you can use for making knots in other ways and allow to try the process.
Step 2. You Have to Create a Loop of the Rope.
You have to take one end of the first line and then create a small loop so that YOU can double it back on itself. You have to create a loop that should be big enough, which can be used to work with not too large a rope with the complicated later on.
Step 3. You Have to Start Wrapping the Rope.
You have to hold the loop from the thumb with the loop and also use the forefinger to keep the rope in place. Take the other end of the second line and then start wrapping the rope around the loop and also with both lines of the rope. You have to wrap it around the 10 to 12 wraps for the knot; make sure to try to wrap the rope very tight and stack way with them beside each other. As you are wrapping the rope, make sure the lines should be parallel to each other on the rope.
Step 4. You Have to Pass the Tag Ends Through the Loop.
As you have completed the 10 to 12 wraps on the rope, tighten it, then take one end of the second line and then pass it from the loop from behind. You have to insert the rope with the same side as the tags have emerged at the end. This will create a loop with a small side for the wrap.
Step 5. Make Sure to Tighten the Wrap of the Rope.
Here, you have to hold the bot at the ends of the tags and the loop using the thumb and also the forefinger for a hold. You have to pull the ends of the tags, which makes it tighten on both sides of the end. As you are wrapping, make sure that you have done it very smoothly and evenly. Apply a little bit of tension on the rope, but be careful you don’t have to pull too hard, which can also damage the line while holding it.
Step 6. Make the Knot Finalize.
As the wrap you have done is snugly in the place where it should be, keep the wet rope with the water or the saliva to keep it lubricated. This will keep the low in friction and prevent the lines which have been overheating by tightening the rope. You have to hold the ends to the end of the tags and slowly and steadily tighten the knot by pulling the lines of the rope. Make sure that the wraps you have done have been compressed properly with one down at one and sure the gaps have not been taken in the ropes in it.
Step 7. You Have to Cut Down the Tag of the Ends.
As the knot has been safely tightened, you just have to cut down or trim the ends of the tags using the shape line cutter or scissors. Have to keep the tag of the rope with a length of ¼ inch to have some extra security and to prevent the knot from cutting and slipping.
Step 8. Make Sure to Test the Knot You Have Made.
You have to make sure that the Alberto knot is made very clear and should have the reliability of the knot with a test on some things and then go to the actual fishing situations. Gently take both ends and make sure that the knot holds firm and does not slip or unravel. As the knot has cleared all the tests you have taken, then you can be processed with confidence with fishing.
Note.
The Alberto knot that you are using or will make in use is very effective for joining the lines with the different materials or diameters with the material of monofilament to fluorocarbon and the braid to fluorocarbon. It makes the connections for the easily passes through good guides reducing the risk of tangles and snags.
Uni knot.
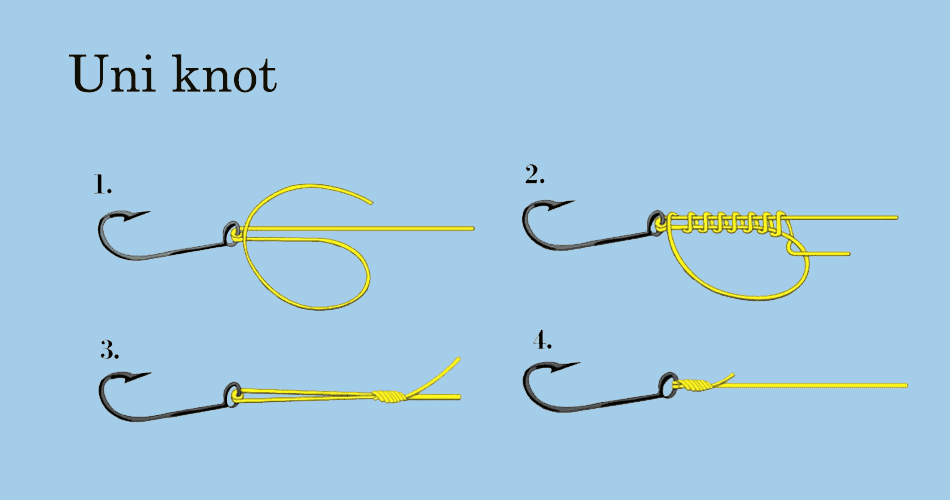
We know about the uni knot, but it is also called the Duncan loop or the inner knot, which is versatile, and it is a very famous knot that is used by anglers with different applications on the water. It is very well known for its strength and simplicity as it is easy to try. As this makes it very easy to build and well-known to the anglers for fishing and has been in decades in the water for use. As you try to make the uni knot, first you have to practice the uni knot very well for trying with the pieces which are not in use and also can use for the cord and try to make it with the fishing lines, which mostly the anglers prefer.
Given below are the steps to make the uni knot; just follow the process on it.
Step 1. You Have to Thread the Line.
You have to take an end of the line and then throw the rope in the hook of the eye, lure, or swivel. Keep the sufficient safe to the tag end of the work and should have the length around 6 to 8 inches to be used to tie.
Step 2. You Have to Create a Loop.
You have to hold the line with the end of the tag together, forming the loop of the rope. Now, pinch in the junctions with the help of the thumb and also the forefinger; make sure that the tag end, which is at the top, also has to face away from the loop of the rope.
Step 3. Start with the Wrapping with the Rope.
Take the end side of the rope and then start to begin wrapping it around by standing the line and through the loop so that you can be created. You have to wrap the rope around 5 to 7 times, making sure that the wraps you have done should be tight and neatly which is stacked beside each other. You have to keep the wrap the parallel line way to each other.
Step 4. Pass One of the Ends Through the Loop.
As you have completed the wrap, please take one of the ends of the tag and then pass through the loop from the top. It enters the same side of the emerged. This will create a large loop of the side which is wrapped.
Step 5. You Have to Tighten the Knot.
You have to hold on to both ends of the tag, should have a standing line, and have to begin tightening the knot by just pulling it at the end of the wrap. You are wrapping the rope on it. Just make sure you do it very smoothly and evenly to the rope. Keep a steady tension on the rope, but be careful that you should not pull it hard, or you will make damage the line.
Step 6. You Have to Slide the Knot.
Once the Uni knot is in place, you just have to side it toward the eye of the hook or the lure. This will keep the knot safe and have to prevent it from slipping from the hand.
Step 7. Make a Sliding Knot.
As you are sliding the Alberto knot, then trim or cut it down to the end of the pair using the sharp cutter line. Keep the small tag to the end of around ¼ inch to provide the extra part for security and also can prevent the knot from slipping.
Step 8. Take a test of the Uni knot.
As you have made anything or the uni knot which is made, make sure you have tested using the knot with the actual fishing in practice. You have to tug on the line to make sure that the knot holds firm and does not have to slip on the hand. As the knots have been passed, you can add them for the anglers to start fishing on the water at any time.
This type of knot which is called a Uni knot, has been very good to use and can work any type of conditions you have done on fishing as it is used to attach the hooks and lures also to join the two lines together and create the loop at the drop shot of the connection. This knot Is used worldwide by anglers to make it useful.
You can find over 65 fishing knots you can try to bind with knots that are used by the anglers. These knots are very easy to pull out and make it to the quick position to build on and also used the secure the fishing line by using the different types of pieces of stuff to make in use during the fishing, or, we can say, the pre-preparation of the fishing before you are being entered the in the waters. Lots of different types of knots, which consist of some used for the attachment of the terminal tackles. Some are with the use of keeping it together, and some kinds are in use of both in other ways, which the anglers want. It makes sense creating the knots is very critical as they know what is being built between the reel and spool for catching the fish. Some knots are tied with the two ends of ropes and have flexible material together. Hitches were used for the rope to build around the object with the pole and also the stick as bumper and some of the other objects to hand on it.


