
We all love fishing to do, and it takes us to nature with beautiful views to watch. We mostly found fish in the ponds and rivers for fishing to take place (Arbor Knot). You enjoy the weather and have the best way to take back to nature and make yourself healthy nature and like to breathe the fresh air to have the world in you and give a healthy way to live life from the busy area of the city. The sound we hear in the city is just horns and polluted weather, but nature has its way to view to making you different from the city area. Fishing is the part where you can enjoy and connect with people and enjoy communicate with others and have fun, and you can also enjoy the weekend as you want. For fishing, you need a stick and a proper way to learn how the stick works. This is just one of the types which you can learn for the way to work on.
The process for tying the arbor knot for fishing?
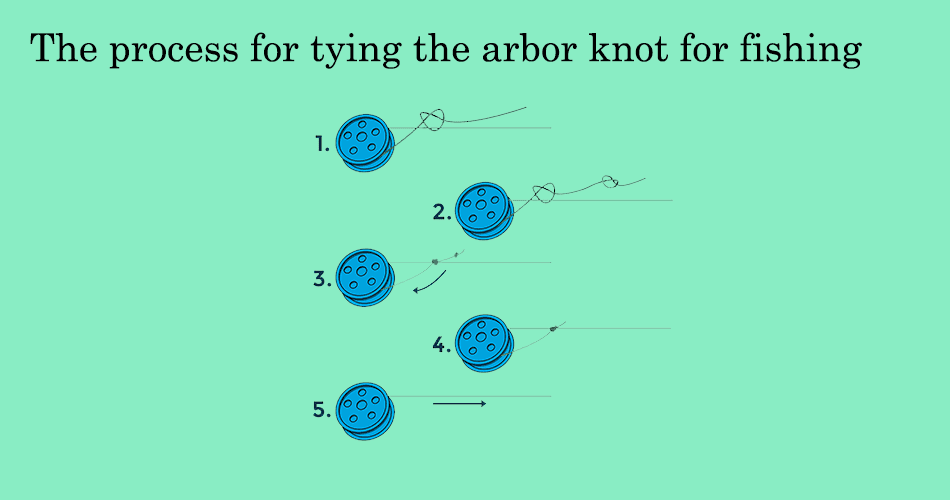
The arbor knot is famous for fishing which is secured with fishing lines for the spool to fish the reel in water. It is a very easy-to-use and reliable arbor knot and has strong connections for them to rely on for fishing between the reel and the line. The given information will provide you with the information on how to tie the arbor knot. Given below is the easy process to follow, and you can master the knot while fishing with your family and friends.
The material needs for the fishing reel to tie the arbor knot.
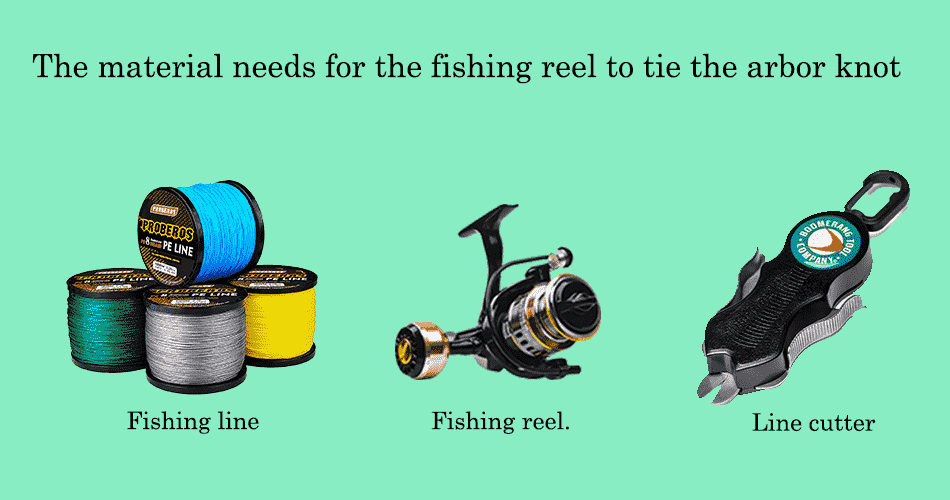
Fishing line.
The fishing line you use is very flexible. It is the high-tensile cord that is used for pulling the fish, which is attached to the hook. Choosing the fishing line is very important and is suitable to use with its type if you have to do any plan. There are some of the common lines used for fishing to tie the arbor knot, as they are monofilament or braided. For pulling the fishing line, which is stored in the reel, you can also use your hands to pull on, which is flexible to the end of the rod or through the motor. This line is very long to pull and can have an ultra-thin rope with the attributes of length, material, weight, and thickness. This type of material is made of synthetic polymers, which are known as nylon or polyethene.
Fishing reel.
The fishing reel is hand-cranked to use the reel in rolling the wind and slow use for fishing line, which is placed on the fishing rod, which can also be used for the arrow material to play or work on while bow fishing. This modem is used for the fishing reel, which has the fitting aiding to through in the distance and place in an accurate way, that also controls the line and the tension between the line to retrieve to line snap which has been avoided and from the hook. Fishing reels are made from wood which was used locally but made strong by working on it. This makes It very strong to hang on it. This reel is typically fixed on the fishing rod, which is added with some sensors to retrieve the line, which is mounted directly to sport boat gunwales and used for trolling.
Line cutter.
This is used for cutting and trimming the line as you have tied the knot. You have to cut it properly because you used to build it the proper way, which can be used for fishing. This cutter is made only for fishing reels which are very hard to cut but can only be cut by the line cutter of the reel.
We have picked up all the material needed for the fishing; let us start the process of trying the arbor knot.
- Step 1. You have taken the rod and then measured the line with a length of 8 to 10 inches from the fishing line. You have to make a double line between the reel spool arbor, which is the middle of the opening of the spool.
- Step 2. For the next step, you have to tie the overhanded knot, which is used for the double line way to make one. To continue the step, you have to cross the doubled line itself or create the loop for a knot.
- Step 3. You have to take an end and then pass it through the end of the line, where the loop creates the knot.
- Step 4. Make sure to tighten the knot, which is overhanded, by pulling the ends of the line with both ends. Make sure the line which Is used should be a little loose but should not be too tight.
- Step 5. Hold on to the main line, which is attached to the fishing rod with one hand, and the end of the tag of the line, which is passed to the reel spoof on the other hand.
- Step 6. You have to reel the line onto the spool of the hand of the reel. While reels, you have to make sure that you are winding the reel very properly on the continuous way on the line and not be too tight and too loose, which makes it easier to reel on the way for the fishing.
- Step 7. When you are being reeled to the sloop, you have to apply the reel with an equal pressure with the long tag ends using the figures, which can be used very properly. The pressure which a constant way to prevent the line from slipping way and if it does not, it will become loose, which can make proper use.
- Step 8. You have to reel continues with the amount of way line on the spool in a perfect way. Make sure you have to leave a small gap between the reel with a length of 1/8 inch in the line and make use of a spool with the outer rim to overfill the reel.
- Step 9. As you have completed the amount of the reel to the end of the line, stop the reeling on the spool and then make the overhand knot trying to secure the line and then make a stopper knot the end for the line to be held on to the spool. This way, it will prevent the line from not rappelling the line accidentally.
- Step 10. Cut down the line which been extra or excess to the line or use the line cutter to cut the line for the reel holder; you should leave a small amount of the reel on the spool with a length of ¼ inches.
The process given above is completed with the tired arbor knot for fishing. You have to practice the arbor knot, which is very easy and can be mastered in very few days if you practice continues for the arbor knot and become comfortable. As you mastered the arbor knot, it was easy and strong to tie the knot.
You have to know that the arbor knot is used for attaching the fishing line of the spool on the fishing reel. You can also tie the knot to the hook or the leather, which can be used for fishing, and you can try to use different types of knots, which can increase and improve the clinch knot and also the Palomar knot.
Make sure you have to tighten the arbor knot very properly you are fishing to avoid line breakage and slippage. You have to check the arbor knot and make sure you can retire it. Make a proper knot and gestational for enjoyable fishing.
The Reef knot.

The reef knot is also known as the square knot, which is commonly used in different types of applications, including camping, hiking, and boating. This type of knot is to connect both ends of the rope or the cord to keep the equal thickness. In this process, we will knot the steps to make the reef knot and make sure you have mastered the reef knot very easily.
Given below is the material needed to gather to make the reef knot.
You have to make use of the thick rope, which is equal in strength and size and also should long to keep the use to intended.
You have to keep your scissors and a knife, which you will need to cut down the rope with the length you want to make use of.
Given below is the process for tying the reef knot.
- Step 1. Take the two ropes, which are side by side, as their ends are aligned. Make sure that the rope you are using show is overlapped in the middle section.
- Step 2. Take one end of the rope to the side-hand side and then cross to the left side. Both ends should be pointed at each other.
- Step 3. Take one end of the rope to the right side and then pass it under the rope on the side of the left.
- Step 4. Take one end to the right side of the rope and then cross it again to the left side, and create a loop.
- Step 5. Take one end of the rope, then to the right side, and then pass it loop from behind.
- Step 6. Take both ends of the rope and tighten them very carefully the knot by pulling them in different directions. Make sure that the knot is sound and properly tied.
- Step 7. Check the knot is bean make very symmetrical and has been secured. The reef knot should be connected with two interacting loops that are parallel to each other.
The process of a reef knot is being completed. You have to practice the reef knot many times to make it easy to apply and shoot to make it. You can use this type of reef knot for everyday tasks and activities which are done outdoors. Practice it every day, and make sure you can tie the knot when it is needed.
Water knot.

The water knot is which is also called the tape knot or the overhand bend. The water knot is commonly used for the joining of the two ends as webbing and also the flat ropes. This type is used for climbing, rappelling, and also some outdoor activities which can keep the knots safe.
You need to gather the material to make the water knot or the tape knot.
It would help if you had to take equal ropes with the same weight and also the same material which they are made of. You can also have scissors or a knife, which is an option to use to cut down the webbing, or the rope, which is to a length that is required.
Steps for trying the water knot.
- Step 1. Take the two ropes in the end with webbing and rope side by side, with the ends connected. Make sure that the middle section is webbing and the ropes are overlapped.
- Step 2. Take one end of the rope of webbing and cross over to the other end of the rope by forming the loop.
- Step 3. The ends should be webbing by the side through the loop which has underneath.
- Step 4. Take an end of webbing from the right side now and then bring it to loop over and back to the loop from time to above.
- Step 5. Catch both ends of the rope and tighten the rope very carefully by pulling both ends in different directions. Make sure the knot is properly reached.
- Step 6. Check whether the knot has been tightened or not. The water knot includes two interlocking loops which are lying between two parallel ends.
The water knot is mostly used for outdoor activities in different manners, which include climbing and rappelling.


